Dec 15, 2023

Creative Crew December Challenge

On the 15th of the month, The Creative Crew posts a card according to a monthly challenge. This month it was my turn to create the challenge and it is:

Non Traditional Christmas Colors

I thought it would be fun to stretch our creativity a bit and create a Christmas card that features colors that are not traditionally used at Christmas.


Here's my card >>>>


The wreath, "Peace" and ornaments are all glittered with clear Wink of Stella. I think I need an actual camera instead of my phone to get better photos.  Everything is popped up with foam strips.

I chose the background panel thinking that it looked like the night sky.


Kit contents:

2 folded card bases in colors that coordinate with the DP.  The card bases are from an ancient pack called Country Patchwork by Making Memories.


DP is from the pack called Ink Drops - Dusk by Craft Consortium. 


The images are All Together Holiday by Taylored Expressions, stamped with “INTENS-ified Black” by Hero Arts ink. 

Ribbons are all from my Big Box of Ribbons

Adhesive gems from The Paper Studio

White flowers by Prima

Sequins are from Close to My Heart
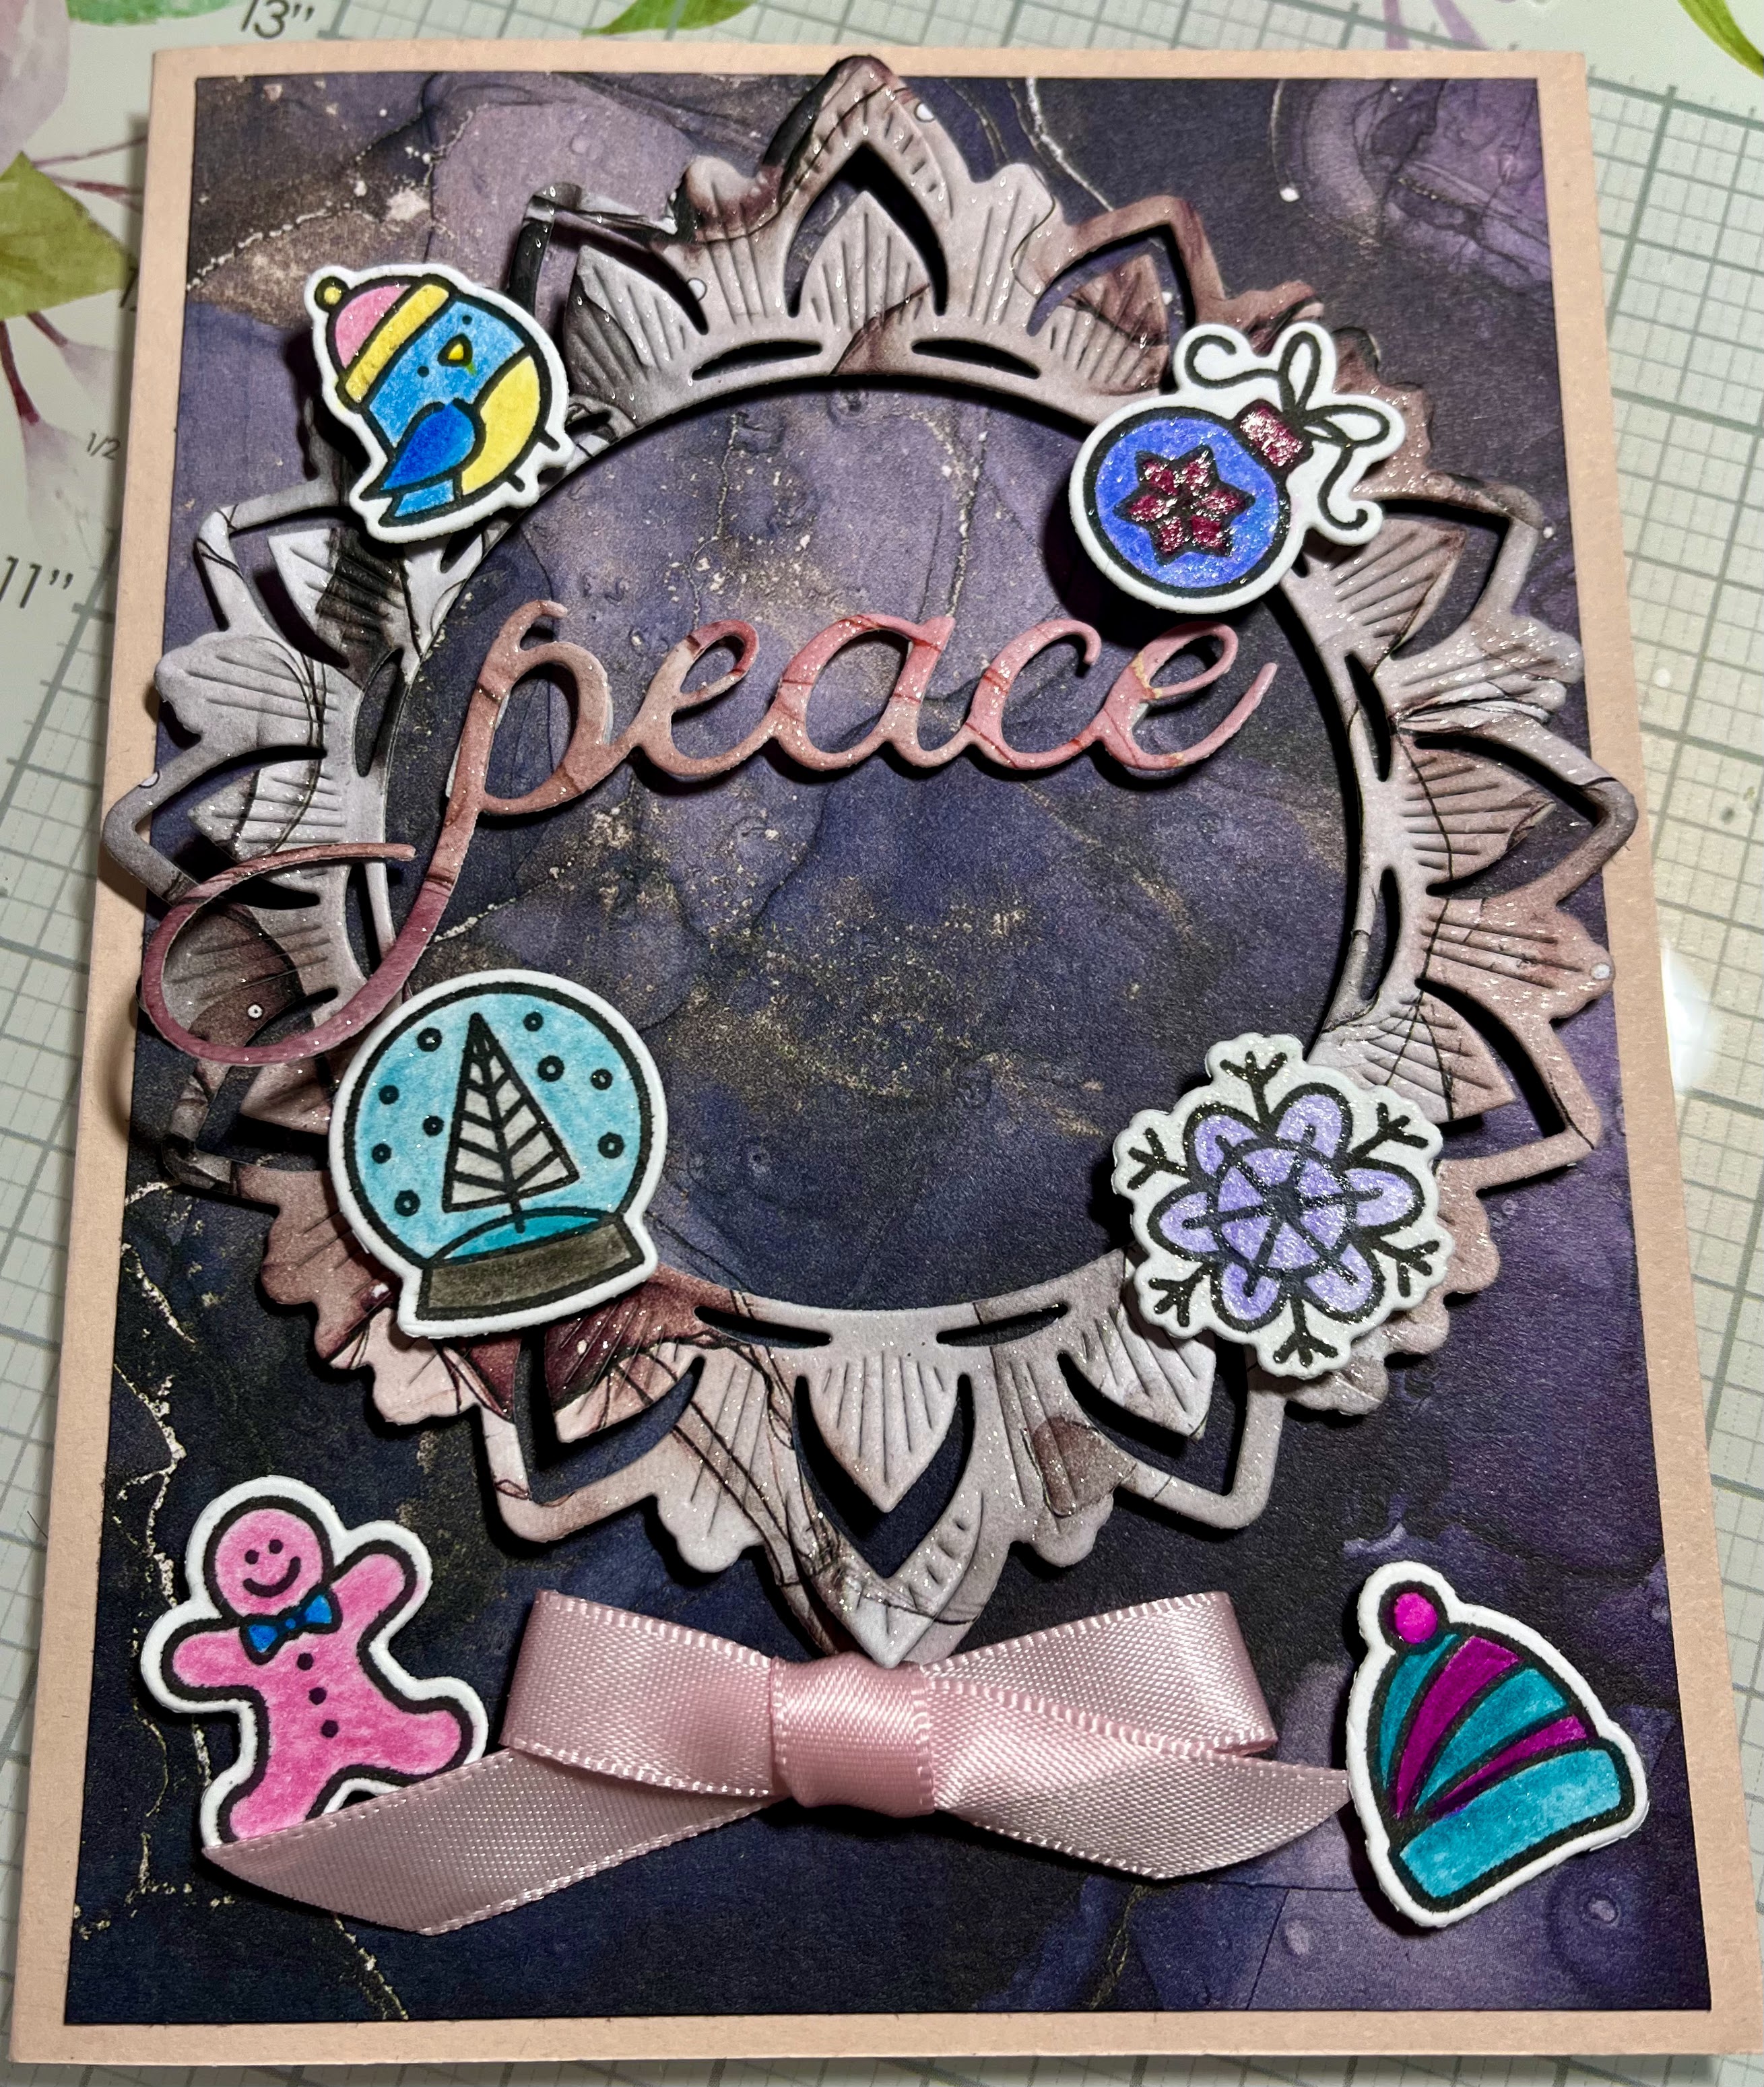
I used Castle colored pencils for the ornaments, then Wink of Stella to give them all a shine.

The wreath is a die set called Ornate Circle by Pinkfresh Studio. I love it!

Thank you to all of my friends on The Creative Crew for creating with my challenge this month. Please drop by the blogs and galleries of the other Creative Crew members: 

Barb - Barb's Inkin' In Retirement

Carol - Lost in My Craft Room

Jeanette - Cre8tive Play

Lorraine - SCS Gallery

Terry - It's Totally Terry

Tracie - Crafty Creations by Tracie

Oct 21, 2023

October Double Duty with Lawn Fawn!

On the 22nd of each month some friends challenge ourselves to create 2 different cards repeating the same image, sentiment, etc on each card.  We have a predetermined list of the stamp company or specific challenge for each month and then...away we go!

This month we feature Lawn Fawn.  I chose their "Sunny Squirrels" stamp set and "Sunflower Greetings" dies in addition to the matching dies for Sunny Squirrels. Some of the background layers were cut using "Card Layers 1" dies by Jaded Blossom and a partial circle shape from an unknown source in my stash. I think I bought it at a stamping rummage sale.

Here are the supplies:


And here are my two creations:


Duplicated on each card:

      • Base stock is Stampin' Up's Naturals. I really like the little flecks of colors on it. 

      • Gray stock.

      • A scrap of paper from a pack that I used to have. I have no clue who made it. 

      • Flat circle die cuts which are blended with yellow and blue or slate inks. 

      • Sunflowers which are colored with Chameleon pencils. 

      • Enamel dots by Stampin'Up.


Just look how frisky and cheerful these little squirrels are!


The red squirrels are cut from the reverse side of the DP with the leaves.


I love this set by Lawn Fawn and think it's versatile enough for many occasions.

Lawn Fawn included it in our kits supplied for the Fall, 2022 Crop & Create Delivered virtual card making event. How nice is that?


Thanks for visiting my bitty blog today! I hope you check out more Double Duty cards made by:

Barb

Jeanette

Carol

Oct 15, 2023

October Creative Crew Challenge

Today is the 15th and that means it's posting day for the Creative Crew's challenge cards.  

Jeanette is this month's hostess and the challenge is "Something We Love". We are to use our own supplies. I've had a lifelong love of birds, all breeds, all sizes.  Of course I also love to make cards, so combining the two seemed perfect.

This card is made from a kit of supplies sponsored by Honey Bee Stamps. It was part of their class at last month's Crop & Create Delivered, a virtual card making event brought to us by Scrapbook and Cards Today.

All papers, dies and the sentiment stamp set were made exclusively for the event, so they only have "Crop & Create Fall 2023 as a name.

There is some subtle ink blending on the bird, pine cones and some of the branches and leaves.


Here's another view showing some of the dimension:


I haven't put a sentiment on it yet. Once I decide who is receiving it I'll pick out the sentiment


I'm not one who typically makes a card using only die cuts, but I really like this set of dies and paper.  And of course, there's that adorable bird!


Jeanette, this was a particularly good theme. It made me think repeatedly of all the various parts of life that make me happy.  Sometimes, a good reminder of my blessings is just what I need to lift my spirits!

Thanks for stopping by and please drop by the blogs and galleries of the other Creative Crew members: 

Barb - Barb's Inkin' In Retirement

Carol - Lost in My Craft Room

Jeanette - Cre8tive Play

Lorraine - SCS Gallery

Terry - It's Totally Terry

Tracie - Crafty Creations by Tracie


Oct 11, 2023

Hot Mess = Success!

Time for another Hot Mess = Success card!  Requirements:  Get messy and make a card.

This month I used a set of supplies from a class taught by Simon Hurley at September's Crop & Create Delivered virtual card making event.

Simon's class featured these products:


Winter Scene Maker Layering Stencil

Royal Flush Solar Paste

An exclusive stamp set made specifically for the Crop & Create Delivered event

Ranger's Detail Blending Tools


(Yes, that's my newest indulgence, the glass mat by LDRS Creative)

Here's my card:


Blue ink was applied to white card stock. 

Then the trees, houses and base were inked using the different sections of the stencil.

Next the snowfall was created using the Royal Flush Solar Paste applied with a scraper.  It dries quickly, so then I created the glowing windows and doors with the final segment of the stencil. This step used Slippery When Wet Lunar Paste applied with the little Detail Blending Tools.

The sentiment is from the stamp set and is heat embossed in white.


Here's another angle showing more of the pretty snowflakes from the Solar Paste: 

I really like using the Lunar Paste and the Solar Paste!  They are super smooth and apply easily. But have soapy water handy because they dry really fast and you want to get them off your stencils right away.

Be sure to stop by the Hot Mess Team and admire their creations!  Here are their links:

Jeanette

Barb

Terry

Carol

Sep 19, 2023

September Creative Crew Duel (just a bit late)

The Creative Crew is a group of card makers and we have a monthly challenge or "duel" as we like to call it. We take turns creating the challenge and then each of us has to create a card according to the criteria established by the host. It's always fun to see what everyone comes up with.

September's challenge is the brain child of Jeanette. She sent each of us a die called "Stitched Scallop Edge" by Your Next Stamp.  However...our challenge is to NOT use it as a die.   Hmmmmm  🤔

After some false starts I came up with an idea. Use the die as a stamp to create an image. Here's my card:

The background is a stencil called "Mini Butterfly Meadow" by Jaime Echt of The Crafter's Workshop. Inks were applied using blending brushes.

The die is inked with "Grass Green" ink by Gina K Designs and stamped onto white card stock. Then the die is inked a second time and flipped around to stamp the underside of the inch worm. 

He was then sponged with the same ink and the stencil placed over him to create the grass along his body. The inch worm was cut by hand, a tiny brown gem created his eye, and he is popped up with some foam tape.

My first ideas were to try to make a flower out of the die, by cutting it into segments and arranging them into a circle. I'm glad that I tried to do it with pencil and scrap paper before jumping in and cutting apart the die. It didn't work (or I couldn't make it work hahaha) so I would have ruined the die for nothing.

Thank you Jeanette for such a fun and unique challenge this month!

Hop on over to admire the rest of the cards from The Creative Crew:

Barb - Barb's Inkin' In Retirement

Carol - Lost in My Craft Room

Jeanette - Cre8tive Play

Lorraine - SCS Gallery

Terry - It's Totally Terry

Tracie - Crafty Creations by Tracie

Aug 14, 2023

Creative Crew's August Duel!

Today is the 15th and it's time for me to post my Creative Crew Card!  I'm getting set up (slowly) in my apartment...moving takes time.  It feels good to finally make a card, it's only been since May 😉.

This month's challenge is hosted by Lovely Lorraine and she has chosen two of her favorite things: Wreaths and Gingerbread People!  Here's my card:

Lorraine's kit had so much goodness in it, I wanted to use it all. However, I had to settle for using almost all of it, hahaha.

The wreath image and sentiment are from Your Next Stamp's "Holiday Wreaths" set. 

The designer papers are "Gingerbread Kisses" by Simple Stories and Photoplay's "Sugar Cookies".

The cute ribbon, gingerbread man and red gems are from her stash.

The wreath and Merry Christmas banner are colored with Spectrum Noir markers. I wanted to add some sparkle, but haven't found my Wink of Stellas just yet.

Thank you Lorraine for making such great kit with wonderful papers and goodies to work with!  Before we know it, we really will be in the holiday season.  Hard to believe that it's the middle of August now!

May 12, 2023

Hot Mess=Success for May

Time for another Hot Mess = Success card!  Requirements:  Get messy and make a card!


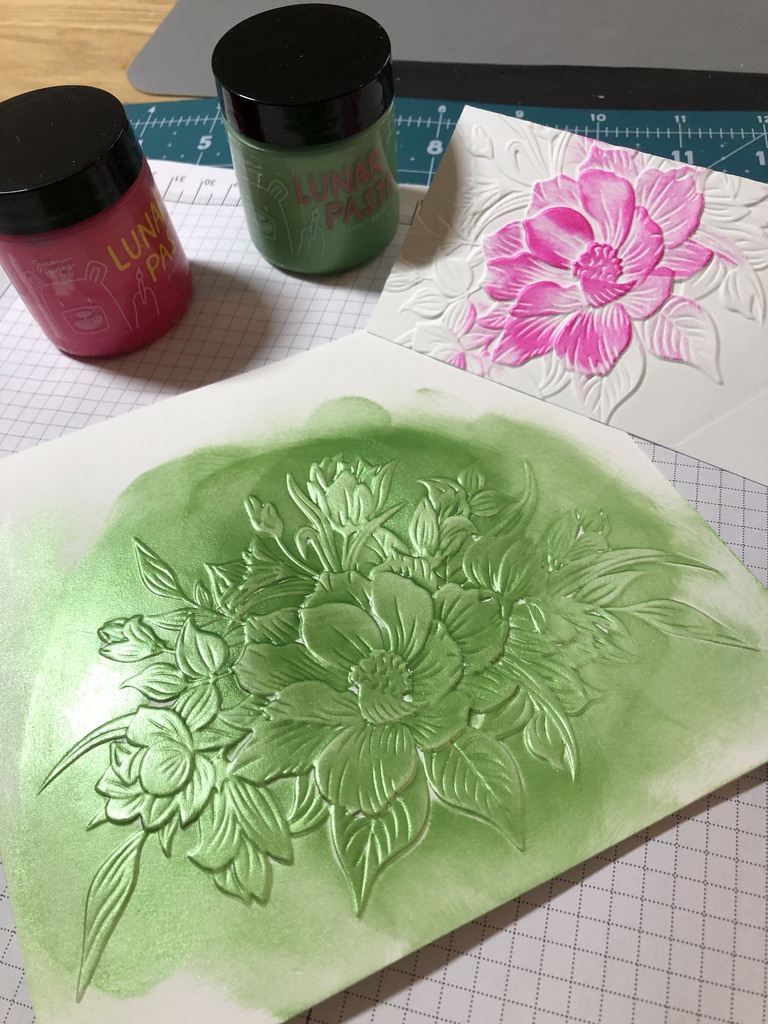
This month I tried my hand at using the Lunar Paste with Embossing Folders.  

This was made with the 3D Embossing Folder "Wildflower Spray" by Lisa Horton Crafts. White stock was embossed and then die cut with the coordinating die.  An extra blossom was embossed and fussy cut by hand.


The Lunar Paste was applied with a light touch using a sponge blender. The large piece was sponged with "Later Gator" and the extra flower was lightly tinted with "Prom Queen".

Then the pink blossom was fussy cut and the large image was die cut.  The die cutting process flattened the image so I ran it through with the embossing folder a second time and the image popped back to life!


The next step was to fine tune the coloring. I sponged on hints of "Slippery When Wet" (gold). This broke up all the green and toned down the pink a bit. 

I used a small, stiff paint brush to apply some pink to the flower buds, then also tinted with the gold paste.


A white panel was die cut using "Blanket Stitch Layers" die by Waffle Flower.  I masked off the center and sponged "Slippery When Wet" Lunar Paste along the edge to create a frame.  


Now it was assembly time. The large floral is popped up with foam tape and the pink blossom is also popped up.  

I didn't care for any sentiment on the front, so the inside has a hand written note specifically for the person who received this card.

This was a fun creation process!  I really like the versatility of the Lunar Paste and using them with embossing folders is great.

Thanks for visiting my blog today. Be sure to stop by the Hot Mess Team and admire their creations!  Here are their links:

Jeanette

Barb

Terry

Carol