Jan 27, 2021

Mini Winter Stamp Camp: Barb's Class

Some dear friends and I are holding a virtual Mini Stamp Camp - Winter Version this week. Barb was our instructor for Monday and she posted a great tutorial on Strip Cards.  Check it out here:

http://inkingintoretirement.blogspot.com/

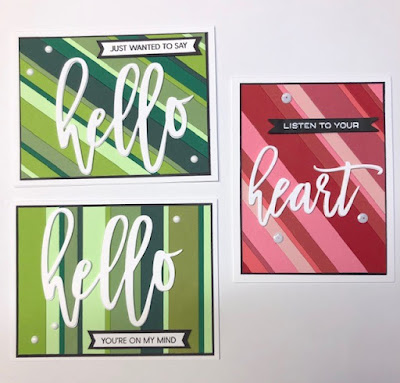
Here are her lovely cards:


The technique is to cut strips of matching card stock in various widths and adhere them to a panel.  Die cut several sentiments and glue them on top of each other to get some depth.  Then mount the sentiment to the front of the panel.  Pretty cool, huh?

Here's my take on her challenge:


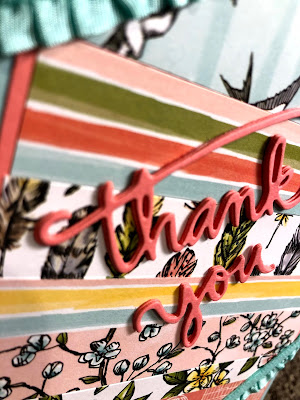
Papers are from Stampin' Up's Bird Ballad collection and the ruffled ribbon is also Stampin' Up, Coastal Cabana color.  

The die is "Thank You Cursive" by Savvy Stamps.  I cut 4 layers and glued them together to get some depth since the die is so delicate.  Here's a side view:


This was a really fun card to make and it has a lot of potential, limited only by one's imagination.

Thanks Barb for a super start to our camp week!  I need detention from you, as I am tardy with completing your assignment <wink>

Here are our blogs and the days we are the camp counselor:

Monday, January 25 ~  Barb @ inkingintoretirement
Tuesday, January 26 ~ Darlene (me!) @ Accordingtobijou
Wednesday, January 27 ~ Kelly @ Sandcastlestamper
Thursday January 28 ~ Jeanette @ Creativeplay

Hop on over to their blogs and admire their take on each day's challenge!  Join in the fun and play along.  We'd love to see your work.

Jan 25, 2021

Stamping Sisters Mini Winter Camp - Day 2


Welcome to the Stamping Sisters Mini Winter Camp 2021.  Last year our first Stamping Sisters Mini Card Camp occurred June, thanks to our dear friend Kelly.  Once Kelly set up all of the details, the rest of us just couldn't resist joining in!  

We all had such a good time last summer that Barb stepped right up and agreed to  organize another round which is set for this week. Thanks Barb!

Here are our blogs and the days we are going to be the camp counselor:

Monday, January 25 ~  Barb @ inkingintoretirement
Tuesday, January 26 ~ Darlene (me!) @ Accordingtobijou
Wednesday, January 27 ~ Kelly @ Sandcastlestamper
Thursday January 28 ~ Jeanette @ Creativeplay

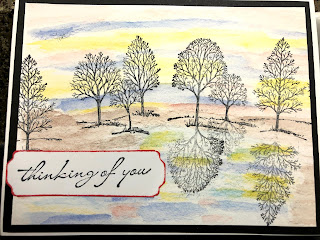
OK...my class, along with my "tutorial" is "Reflection Technique".  Why do I have "tutorial" in quotes???  Because my card is a lesson in what went wrong!  Hahahahaha!  I can't wait to see what you all can do RIGHT!  I do hope that you  play along and have fun in our winter virtual stamp camp!


  So...My idea was to watercolor a landscape with sky, earth and lake.  Then create silhouettes of trees using SU's timeless classic "Lovely as a Tree" set.


For this project I decided to use pencils and a rough water color paper because the texture would add to the landscape.  I used a very fine brush so that I could control the water and blending.  Didn't want my sky to turn green if blue and yellow mixed!

Here is the background panel...before I decided that the lake needed colors from the sky reflected in it.  You might NOT want to do this hahaha.


Here you can see the SU watercolor pencils and tiny paintbrush that I used to limit the amount of water while blending.


After the blending was (sort of) done, I trimmed the panel to match the CS that would frame it on the card stock.

Then the real "lessons learned" began!


As you all know by this picture, I masked off portions of the long stamp in the set which has multiple trees, picking and choosing which trees I wanted in the landscape.
DON'T DO THIS!  Why? Well, in order to make the reflection in the water you need to stamp it upside down from the initial image.  Which meant that I needed to carefully remove ink from the stamp and try to line it up under the original image...some of the trees are overlapping on the stamp, making it difficult at best.

Oh! Another thing that I would not do again is include so much of the yellow and coral reflection colors in the lake.  I think it is too distracting.  

Here's another big lesson: I used Memento Tuxedo Black and it's too light on the original set of trees and even lighter after stamping it off once to make the reflected image.  Use a darker, more juicy ink because the watercolor paper absorbs so much of the ink.  But remember to stamp off the reflected image first before applying it to your panel.

I read that you could stamp your image onto an acrylic block, then use the acrylic block to apply the reflected image to your panel.  Here's me trying to line up the acrylic block so that I can stamp the trees and use the block to then stamp the reflection.


DON'T DO THIS.  Hahaha
Epic fail. I ended up with a bunch of black smudges in my lake.  

Which is why I added the sky colors to help cover it.  Sigh.


What I ended up doing was painstakingly inking and wiping off areas of the stamp that I didn't want to make individual tree reflections. If I just stamped the whole panel without mixing up the trees, I would not have had to do this for the reflection.

Back in 2012 (really that long ago?) I posted a reflection card using vellum with the reflected and colored image.  


Flip the vellum over and you have an instant reflection of the original image.  This time I wanted to try the reflection technique without vellum and using watercolors and a silhouette image...I still think it's possible. 

I have every confidence that Jeanette, Barb and Kelly will prove me right!  Please visit their blogs and see how they apply my lessons learned and create great reflection cards!

I can't wait to see your lovely Reflection Cards and learn from you!  Hopefully my tips and lessons learned help you make a masterpiece.


Jan 15, 2021

Classy Card Ladies' January Duel!

A group of friends on Split Coast Stampers have been "dueling" on the 15th of the month for years. This year we did a refresh, changed our name and team names and Bang! We're off for a fun year of dueling again!

This month "The Pearls" (my team) hosted by the lovely Jeanette, and "The Diamonds",  hosted by the effervescent Kelly chose "Winter Fun" as the theme.

Here's my card with Jeanette's great kit:

I folded the card off-center by about an inch to give me a panel on the right and die cut 3 hearts from the pretty papers that Jeanette included.

The image is colored with Stampin' Up Blenders and the snowball and ground are accented with Stickles.


Here's the opened card where I cut apart the sentiment and stair-stepped it.

Kit contents included:

CC Designs "Snowball Heidi" and sentiment by Close To My Heart's "Flakey Friends" collection.

All designer papers are from Recollections "Fa La La" paper pad.

Red snowflake ribbon is from Joann's and the teal ribbon is Offray.

Jeanette's generous kit also included rhinestones, sequins, a wooden snowflake (that I really wanted to use but couldn't work it in) and a charm with a snowflake brad.  I'm thinking another card is in order to feature these goodies!

Time for me to run over to my folks' house and get their dinner ready, but when I get back home today I'll finish this post with the names of everyone on the Pearls and the Diamonds.  I will also update my side bar with links to their galleries or blogs to make it easy for you to visit and admire their cards.

Good bye for now!

Jan 14, 2021

January's Hot Mess!

 On the 12th of the month, a group of friends on Split Coast have formed a "Hot Mess" challenge group.  The only requirement is that your project is messy to create!  No need to check your calendars...I'm a couple of days late.  Below is my card.

The colors are purple and yellow.  This card is for Barb's swap on Split Coast and the challenge is to use only two colors.  

It's a full sized floral background stamp and the large rectangle mask was used from Taylored Expressions Masking Stencils.  Then the Happy Birthday sentiment was stamped.  Purple ribbon and yellow flower finishes it off.  

End result is an easy-to-mail card because it's flat!  The other end result were several stained fingers and fingernails from removing the mask, washing it off, then making the next card!  My cotton wash cloth that I use for stamping is also stained, LOL.


Here's the inside of the card:


I hope that Barb likes these cards.  I sure thought it was a fun swap theme.  It challenged me to only use 2 colors.

Now I'm off to these blogs to admire their Hot Mess Successes:

Kelly

Jeanette

Barb

Terry

Carol

Thanks for stopping by!