Feb 28, 2013

Crafters of Faith February Challenge

Welcome to the Crafters of Faith February Challenge!

Many special people bless my life with their love and friendship, and the online blogging group, "Crafters of Faith" are a rich blessing indeed!  Each month one of us issues a challenge and we all post our challenge cards on the last day of the month.

Our dear friend Tami came up with this month's challenge, and it was a great one! Here is the challenge in her own words:

I have a crafting tool that I just had to have and have hardly used. Does that sound remotely familiar?! I think you all may have the same tool in your arsenal. I would like you to drag out your scoring tool. Scor-Pal mini, biggie, Martha mini, biggie or if you do not have one of those, I am sure that you may have a scoring blade on your paper cutter. SCORE!!! It would be fun to see how you all incorporate scoring onto your card. You know I am into 'use what'cha got', so if you do not have a scoring tool of any sort, please create without this element. Oh and I do not mean just a score to fold your cardbase in half! LOL 
While it is a 'lovely' month February, let's create a card that is not Valentine's themed. That being said, it is the second part of this challenge. Let's not use Valentine theme, red, pink or white colors anywhere on our cards. That includes the paper you stamp your image on....*gasp*!
For our third element, how about we place both an image and a sentiment on the front of the card.
See?  I told you it was a great challenge!  Here are my two cards:

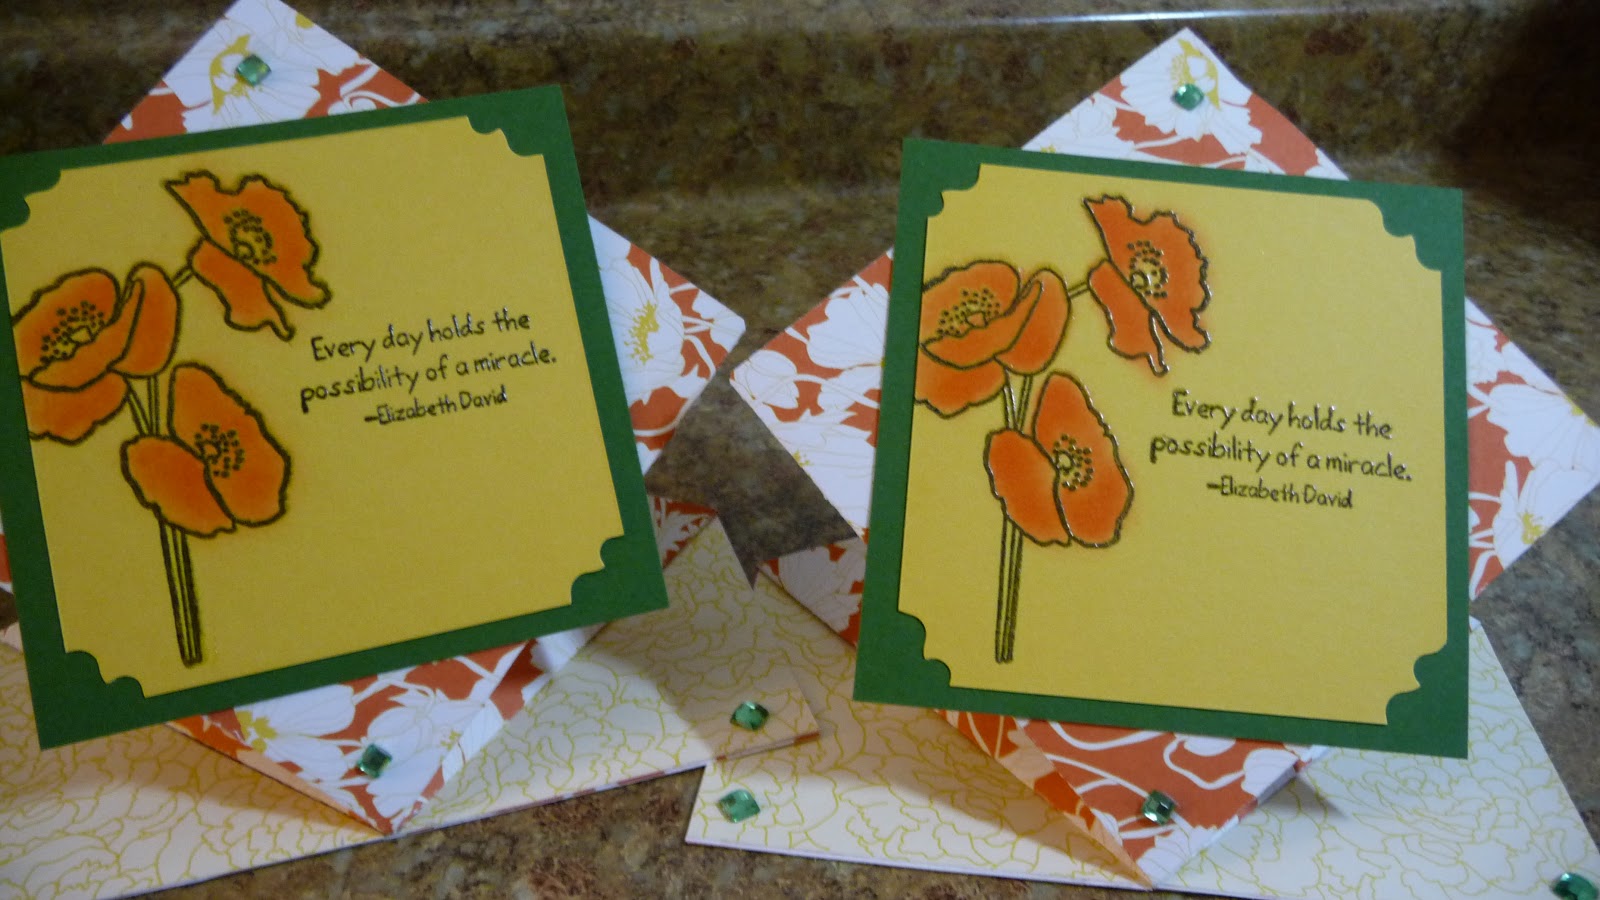
It's called a "Spring" fold (as in spring up)  and the tutorial on SplitCoast Stampers can be found here.  I found it to be rather easy for me to accomplish, although I did have to layer stiffer cards stock underneath the bottom panel to provide more stability than the DP had on its own.

Here is a closer look.  You'll recognize the Stampin Up Designer Paper from a few years back  and the sentiment is also from a SU set called "Peace Within".  The poppy stamp is from the set called "The Country Diary of an Edwardian Lady".  

The green and yellow CS is also from SU and the edges were snipped with some decorative scissors by Fiskars.  The images are stamped in black and clear embossed.  The poppies are colored with a paint brush and ink from an Orange ink pad by A Muse Studios.  The little green gems are from my stash.

Well Tami, how did I do with your challenge?  The only thing new on these cards is the fold!  ha ha.  So I am also going to count these toward the 100 Cards in 100 Days challenge, bringing my total to 55.

Thank you for dropping by and be sure to hop on over to the blogs of the other members in Crafters of Faith.  It's sure to be fun admiring their creations for this challenge.  Thanks Tami!  It was wonderful to learn a new fold as a result of your challenge!

Feb 25, 2013

Two Sets of Thank You Cards


Hello! I have two sets of Thank You cards to share with you today.  Both are in the hands of the US Post Office as they travel to my friend Barb who is hosting a swap on Split Coast.

These were made in memory of my Grandmother and her roses.  When I was a young child I spent a lot of time at my Grandparents' home.  She grew all sorts of roses, but my favorites where the peachy-yellow ones.  So what better way to use the old Stampin Up embossing folder "Manhattan Rose" on a cold, wintery day in February?


The project began with some white shimmery card stock called "Sugar" by A Muse Studios.  Pigment ink
"papyay" by A Muse was brayered onto one side of the embossing folder and then the cards stock was embossed.

After the rose panels were embossed, A Muse's "Grapefruit" ink was painted on with a soft brush.  The Sugar CS is very smooth, which provided a slick surface to move the ink around with the brush, making it easy to blend and achieve soft color accents.


The panel was layered onto coordinating "Grapefruit" CS by A Muse and ribbons from American Crafts were matched for accents.

The Thank You tags were die cut,  stamped & clear embossed with the Sugar CS, "Grapefruit" ink and A Muse's Vintage Labels die set.

I was really pleased with how these turned out.  In fact, I think I'll be making some more of these for special birthdays during the year. (although these did clean out 2 rolls of ribbon from my stash, so I may have to replace them or change up the color scheme).  These will count as six more cards in my 100 Cards in 100 Days challenge quest, bringing my total to 47!

The second set saw me turning to a more masculine style, so out came the trusty "Lovely as a Tree" set from Stampin Up.


 The tree was embossed with a two toned green embossing powder that was a purchase at a stamp show years ago.  There is no label on the little jar, so I'm not sure of it's origin.

The thank you was embossed with copper EP by Ranger and the die cut is also from the Vintage Labels set by A Muse.


The base is a very dark brown print (one side only, so inside is cream) from a DCWV pack "Natural" and the dotted embossed layer is from the "Dotted Swiss" pack by Bazzil.

The ribbon is a brown satin from either AC Moore or Michael's.  A fairly clean layout, with a slightly rustic main panel from SU's "Natural" CS.

I like how flat these two sets are, making them easy to mail.


Here's a look at the supplies used for the first set of cards:


The second set of cards brings my tally to 53 cards, half way to the goal.  I must say that I'm having a great time using up some of my supplies, and pulling out some old stand-bys!

Thank you for stopping by and I wish you a great day!

Feb 15, 2013

Love by the Sea

Hooray for the 15th - the day that the Dueling Darlings can reveal their cards!  The Dazzlers enjoyed a wonderful kit put together by our own Paola, and it was perfect for Valentine's Day, or a special anniversary, an engagement congrats, etc.!

Here's my creation with her goodies:


The only items used from my stash were the blue & red CS and the red Stickles.  Everything else was supplied in the kit.  WOW, what a great kit (many thanks Sweet P!)

This stamp has a special place in my heart, as I've used it to make a birthday card for our son, coloring it to match him and his lovely girlfriend.  So, of course, I colored it the same way this time around.  They are so good for each other and we adore her!


Here's a little close up of the sentiment that we had to work with.  I hand cut (since I don't have many punches) the For You With Love, then used the one circle punch I own to cut the red layer.  Dressed it up with a thick layer of Stickles and popped it up with dimensionals.


This is a closer look at the left side of the card front, showing more of the wonderful DPs that Paola gave us.  She also included those wonderful brads and flowers.  Aren't they pretty?


Paola also included 2 types of glitter ribbon, some red & white floral ribbon and a few other brads.  I spent so long trying to tie a bow with the red glitter ribbon that most of the glitter ended up on my work surface, and the bow looked pretty sad so I didn't use it.  :(

All in all, I am pleased with the colors and the layout so a big "THANK YOU" to Paola for the kit!

Be sure to drop by the other Dueling Darlings and admire their lovely and talented creations.  Their blogs are linked in my side bar.

This is my 41st card in my quest for 100 Cards in 100 Days (the only items used from my stash were the red & blue CS and Stickles)  Thank you for dropping by today!

Feb 13, 2013

Cards 37-40 (Or Last Weekend's Experiments)

By now you probably realize that I am struggling to keep up with participating in a challenge on SCS "100 Cards in 100 Days".  I figure even if I fall short of the 100 card goal, at least I will be using up some of my treasures since the one requirement is that nothing new is bought or used on any of the 100 cards.

Last weekend, between shoveling the snow that the blizzard dumped here, I had time to play, with varied success, as you shall see.

Hmmm, let's start with the success!  Daffodils are my absolute favorite flower.  The valley where I grew up in Washington State had huge bulb farms and Daffodils would cover the landscape as far as you could see!  A sea of bright yellow, seemingly right to the base of Mt. Rainier!  Out came my SU set "Flower of the Month" and I set about to make some March birthday cards.

Here's the inside:

Fiskars embossing plate on the purple CS panel, SU markers to color the tags & a SU wheel to create the bottom border.

The Happy Birthday label is a die from A Muse, their "Vintage Labels" set.

I'm pretty happy with these two cards.


Now for my other two...these will go into my "Idea Pile".  Cards that I can use later to remember what didn't work out so well.  Do you have ones like that?

I've had a lot of fun playing with the Chalkboard Technique.  Here's what I came up with:

I like the ribbon threaded through the MS punched strip, it actually matches the gold paper scallop.

The flowers are from "Upsy Daisy" by SU.  Stamped in white pigment ink and colored with chalks.

The DP is from a pack from DCWV: "The Natural Stack".   The inside is finished with more of this DP and is stamped with the "You're on my mind" sentiment from the same set.


The other card used the Ginko image a SU hostess set from a couple of years ago:


I couldn't get the right color for the berries with my chalks so that was disappointing.  But I do love that lace.  Here's a closer look:


Why are these in my "Idea Pile" (also called "It Didn't Quite Work Out" stack)?  Well...I've found out that the chalkboard technique really works best on completely smooth CS.  The black that I used here has a slight texture, making even coverage difficult.  Plus, I found that it was hard to wipe off the excess chalk around the images.  They actually look better in the pictures than they do in person.  (that's a first for me LOL)

But hey - it's always fun to play with ink & paper, even when some things just don't turn out!

Thanks for reading my long post today.  I'll be back with a few more cards to add to my running tally soon.  Peace!

Feb 12, 2013

Musical Cards & Card Candy

My dear friend Jeanette ("Forest Ranger" on Split Coast) hosts Forest themed swaps and we are just wrapping up her latest swap: "Music in the Forest".  Cards are to be music themed and include some element of nature, forest, trees, etc.

Here's what I came up with:


Here's a top-down view to show the MS Border punch strip and musical stamped background on the last panel.  It also gives a better look at the quote.  It's long been one of my favorite quotes, I'm not sure when I actually found it, but I think it may have been in high school - many years ago!


The fold is stair-step, and I found this wonderful piece of musical paper sandwiched between lots of solid CS.  I think it may have come with an order years ago from Addicted to Rubber Stamps - remember when they used to include one sheet of thin DP to cover up the cardboard in the packaging?  Well, I think that may be where it came from.

The stamped scene is from a set of stamps Technique Tuesday called Tree-mendous.  It's really fun, you can make lots of different scenes with the various stamps in the set.

The ribbon and jewels have been in my stash forever, and the punched flower is SU, with a dollop of Diamond Stickles in the center.  I've made 6 of these (it's a 5+1 swap) so that brings my total toward the 100 Cards in 100 Days challenge to 36, since I will only count the swap as one card.

There was also a category for Card Candy (handmade embellishments that can be used on cards, scrapbook pages, etc.).  These needed to also be music and nature/forest themed.  Can you take a guess what I made - can you?  (hint, who is my blog editor???)

Here they are:

If I didn't use a blue bird I would never hear the end of it!  The music stamp is the same one used for the stair step card, an old favorite by SilverCrow Creations.  It's stamped onto a shimmery white CS, the branches are punched from a glimmery green CS and scallop circle and bird are punched from Tempting Turquoise CS.

Here's a closer look to show the Stardust Finishing Spray (by A Muse) spritzed onto the bird to give him some shine.

The little gems were tough to glue on (I need new trifocals) but I think they're going to stay put!

Thanks for stopping by and, as always, thank you very much for leaving your comments!  It's a lot of fun to see what you have to say.

Feb 10, 2013

Reveal of Unidentified Image Swap!

Woo hoo!  It's February 10th and a group of swappers on Split Coast that participate in the Unidentified Image Swap can reveal our cards!
This round was hosted by Linda and she sent us the happiest puppy I've seen in a long time!  The stamp is called "Tail Wagger" and is from Stampotique.  Here's what I came up with:


See what I mean?  He is so happy, sitting there, just waiting for someone to come and play!  The image is colored with Spectrum Noir markers and bits of various scraps of DP were used.  (Sorry for not knowing their origin, they were gifted to me, cut into 6x6 squares.)

Here's a closer look:

Butterflies are near and dear to Linda's heart, so what could be better than adding a butterfly as an embellishment?  This one is stamped from a set by A Muse: "Snail and Co." and is stamped with "Papaya" ink and heat embossed with "Diamond" EP, both are also from A Muse.

I had a picture of the inside, but accidentally deleted it when working with the pictures for this post.  But the inside was layered with the Green CS and stamped with some other images from the "Snail and Co." set, making this a general card: "Just wanted to say hi".

Thank you Linda for giving us such a fun and versatile image to work with!  I can hardly wait for the returns to come back and see what our next hostess has in store for us.

Since no new things were used for these cards, I think that this will count as #35 in my 100 Cards in 100 Days challenge.  Thanks for stopping by!

Feb 9, 2013

100 Cards in 100 Days: Cards 32-34

I'm trying my best to complete a challenge on Split Coast: "100 Cards in 100 Days", the objective is to use only materials that you have on hand, no new papers, embellishments, ribbon, etc.  You can only replace adhesives if you run out.  Well, I thought that this was a might ambitious for me, but really like the goal of using up some of my treasure trove!

Here is a card that I really like:
The rectangular frame is one stamp by Rubbernecker stamps called "Morning Glory Frame".  I totally fell in love with it at a stamp/scrap show last May and until now, haven't had much success with it.
The beautiful butterfly is from an A Muse set called "Papillon".  A very pretty set!


The embossing powder is a two-toned EP called Silver Moon by Moon Glow.  I picked up a number of these EP's about 5 years ago at another stamp show.

The blue CS is a new favorite color for me: "Ocean", which is also the ink used for the embossing.

I've only made one of these cards so far, but anticipate making more, as they can be used for a variety of occasions.


Cards 33 & 34 are another attempt at the Chalkboard Technique.  This time I used navy CS, stamped a background script and masked out the shape of the flower.  Then using the Stamp-A-Ma-Jig, lined up the flower and stamped with white pigment ink by Color Box.  Then, using SU chalks and sponge daubers, colored the blossom and stem.
The butterfly was cut with my Cricut about 2 years ago.  When I find a cut and paper that I'm happy with, I tend to cut out a bunch and save them for later.

Here are the supplies used for these two cards:


Sometimes it's crazy how many companies and supplies can go into just one card design!  Yep, my mind was wandering all over the place on these two.
But I am having fun with this chalkboard technique.
Maybe give it a try, you may like it too!
Thanks for stopping by.  Now I think our blizzard has quit and it may be time to go get some pictures of that to share!

Feb 3, 2013

January's Crafters of Faith Challenge

In the "Better Late Than Never" Category...
The Crafters of Faith group on Split Coast has a monthly challenge, with cards due on the last day of the month.  January's challenge was hosted by our lovely and talented Sharon and here (a few days late) is my card:

The challenge in Sharon's words:

"2013 is here! What a great time to clear out the old to make way for the new. 

* For this challenge, I would like to see you use both old stash and new stash to create your card/project.

* To add a little fun to the challenge, I'd love to see you try a new technique -- something you've never done before. You can check out google, youtube, or even the SCS forums and galleries for inspiration! 

* Make sure you tell me what's new and what's old and post a link or give a little description of the technique you used."

Sharon, I can't thank you enough for the challenge to try a new technique!  Mine was the Chalkboard technique and now I'm hooked!  It's a very fun way to use those chalks and I am definitely using it some more, so thank you!

Here's a close up of the black doily and the chalked image:

For the other elements of the challenge:
Something old: SU chalks, card stock, background stamp and clear embossing powder.

Something new: the Doily Die from Cottage Cutz.  Although I've had it for several months this is the first time a doily die cut has made it onto a card!

I would just like to express my appreciation to these wonderful friends for putting up with my tardiness.  They really are a great group of crafters who encourage and inspire each other regularly.  Their blogs can be found in my side bar so spend a few minutes and hop over to their blogs to see what they came up with for January's challenge.  You won't regret it!

Blessings to you and yours!