Sep 21, 2024

Double Duty Cards Featuring Gina K Designs

On the 22nd of each month a group of us challenge ourselves to create 2 different cards repeating the same image, sentiment, etc on each card.  We have a predetermined list of the stamp company or specific challenge for each month and then...away we go!

Stamps by Gina K Designs (one of our favorite companies!) were selected for this month's challenge. I decided to crack open my unused 2022 kit,  "Joyful Holiday" stamps and dies.  It was definitely time to let it see some ink.

Here are the two cards that I made. 


Both were made with the "Playful Penguins" stamp set and dies included in the kit.

This card also used the star stamp from the "Star Struck" set which is part of the kit.

The white panel was blended with "Confetti Cake" ink by Taylored Expressions and the stars were gold embossed.  The images were colored with Olo Markers.


The second card is made with images that are all in the "Playful Penguins" set.  The panel and base of the card was ink blended using "Strawberry Milkshake" ink by Taylored Expressions.  

There certainly is a lot of product in this kit. I should get a jump start on making Christmas and winter greeting cards using it.

Please visit the blogs of the other Double Duty members and comment on their work:

Barb

Jeanette

Carol 

Sep 14, 2024

Creative Crew Featuring Newton's Nook


Barb is our hostess this month and she sent us adorable images from the "Happy Howl-oween" set by Newton's Nook.

Her kit also included designer papers by Echo Park Paper and Around the Block.  They all were so cute that I found a way to use all of them.

The sentiment and image has been colored with Olo Markers. Stickles added bling to the pumpkin costume, hat and corners of the sentiment square.

The cute candy corn ribbon completed the whole look.

A big shout out to Barb for such a cute kit!   Here are the links to the other Creative Crew members blogs and galleries. Be sure to visit and admire their creations.

Barb - Barb's Inkin' In Retirement

Carol - Lost in My Craft Room

Jeanette - Cre8tive Play

Lorraine - SCS Gallery

Terry - It's Totally Terry

Tracie - Crafty Creations by Tracie


Sep 11, 2024

September Hot Mess = Success

On the 12th of each month a group of friends challenge ourselves to get messy.  It doesn't matter how we define messy, or what we create.  As long as the process meets our definition of messy!

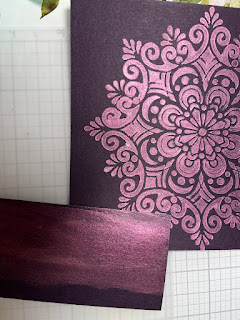
Lately I've been having a lot of fun experimenting with Lunar, Solar and Astro Pastes by Simon Hurley.  So this month, I set out to use some Solar Pastes with a stencil and see if I could get a jump on my Christmas cards.


These are the two cards that I came up with.

Both card stocks are from a pack of my favorites for holiday cards.  It's by Recollections and is at least 15 years old.  Unfortunately I don't know the name of the pack, but it has this beautiful plum color, an evergreen color, the dark blue and a beautiful Christmas red in the pack.

This card was made with the Cross My Heart color of Solar Paste, applied with a foam dauber tool.

This card was created by sponging on Golden Hour and Beluga Solar Pastes.

Both card bases were edged with matching Solar Paste to accent the panel.  Both panels are popped up with foam.

The stencil is called "Graceful Snowflake" by Gina K Designs.  The sentiment strips and die are also by Gina K Designs and all of these were part of her kit in the October, 2022 Crop & Create Delivered virtual event held by Scrapbook and Cards Today.


I used my finger and rubbed the Solar Paste onto a scrap of card stock as shown here.  When it was dry, which only took about 5 minutes, I die cut the "holidays" sentiment for the card front.
I think that the next time I try this technique, I'll do something different for the die cut sentiment so that it has more contrast. It sort of fades into the base of the cards in these versions.

Lessons learned: 
  • Don't try this type of stencil with a regular scraping or spatula tool that you can use with these pastes.  
  • Be careful not to overload the dauber with the paste. With this stencil it was easy to get the paste squished underneath the designs.
  • Wash out your foam topper on the dauber right away so it's good to go for other cards.

Stop by the Hot Mess Team and admire their creations!  Here are their links: