
A Lovebird's View of Life
Mar 24, 2013

Mar 22, 2013
Whipper Snapper's April Showers
My friend Barb on SCS is having a Spring Whipper Snapper and Penny Black Swap.
Here's my set of WS cards using their "April Showers" stamp:


 The image was colored with Spectrum Noir markers and the flowers, raindrops and his eyes were painted with Crystal Effects to give it some shine and heighten the colors.
The inside was finished off with more DP from SEI's pack: "Couture". I think that SEI is my favorite for designer paper.
T.G.I.F. because now I can finish the set of Penny Black cards that I started last weekend. Thanks for stopping by and wishing all of you a great weekend!
Here's my set of WS cards using their "April Showers" stamp:


 The image was colored with Spectrum Noir markers and the flowers, raindrops and his eyes were painted with Crystal Effects to give it some shine and heighten the colors.
The inside was finished off with more DP from SEI's pack: "Couture". I think that SEI is my favorite for designer paper.
T.G.I.F. because now I can finish the set of Penny Black cards that I started last weekend. Thanks for stopping by and wishing all of you a great weekend!
Mar 19, 2013
March Mystery Image Revealed!
A group on Split Coast has a "Mystery Image Swap", where each of us takes a turn at hosting. The hostess selects the image and stamps off sets to send to each participant. We each make 4 cards with the image and send it back. The hostess swaps out the cards, returning 3 cards made by the other members and the images from the next hostess to be completed for the next round.
It's great fun to see what image we get to work with and also to see the wide variety of cards made with the same starting point! This round is hosted by my good friend, Carol, and she chose really fun image from A/I, "Selma and Gladys".

Aren't they a hoot? Here's a closer look:
 The image was colored with Spectrum Noir markers and the red swim suit was paper pieced. All paper came from an SEI pack: "On the Coast". Although it doesn't show up in the photos, shimmer was added to their earrings and the aqua stripes of the other swim suit by using a Clear Spica glitter pen. It's one image but I cut each one out to play around with placing them on the card.


Thanks Carol! Your choice was fun and it sure was great to play with colors and a theme of warmth and beaches during the winter-without-end! (Yes, it's snowing again!)
It's great fun to see what image we get to work with and also to see the wide variety of cards made with the same starting point! This round is hosted by my good friend, Carol, and she chose really fun image from A/I, "Selma and Gladys".

Aren't they a hoot? Here's a closer look:


Two close ups of the gals. They really crack me up, I kept giggling while making these cards, eventually hubby wandered in to see what I was up to!
Here's the inside of the card:

Thanks Carol! Your choice was fun and it sure was great to play with colors and a theme of warmth and beaches during the winter-without-end! (Yes, it's snowing again!)
Mar 15, 2013
March's Duel Includes an Irish Blessing!
It's the 15th of the month and time for another duel between the Divas and the Dazzlers!
April was the Hostess with the Mostest for the Dazzlers this round and let me tell you, she sent us the most adorable image (MFT's ala mode "Wishing You Luck") and pretty shamrock papers. She also included a traditional Irish Blessing and all sorts of pretty embellishments. It wasn't hard to come up with something great!


Just look at that beautiful shamrock DP! It's even prettier in-person. The image was not actually die cut with a Nestability, as the sizing just wouldn't work, so I traced the Nestie die and hand cut with scissors, edging it with dark green ink.
The adorable lass is colored with Spectrum Noir markers, and her shirt and shoes are colored with a silver marker from SU. The shamrock and her headband have a thick coating of Crystal Effects, as you can see here:
Here's a closer look at the Irish Blessing which has been cut into three segments:

 For the flower, I took the gorgeous piece of green & white polka dot ribbon that April sent us and basted long stitches along one edge, drew it tight and tied it off. Then some glue dots on the back kept it in shape while I went digging for a white button. Can you believe that I could not find ONE white button? LOL Then I remembered that I save the extras from prior rounds, and found this beautiful peal brad - perfect!

Here's a look at the inside which features yet more beautiful DP from April.
We were asked to share a RAK that we have done, or one that we have received. This card itself is going to become a RAK as I'm sending it to a dear friend who is recently widowed. I like sending her cards just as a nice little surprise in her mailbox.
April, a HUGE THANK YOU for such a delightful kit this month!
Now each of you, skip on over to the Divas and Dazzlers (links are on my sidebar) and admire their talented creations. You will be glad that you did!

April was the Hostess with the Mostest for the Dazzlers this round and let me tell you, she sent us the most adorable image (MFT's ala mode "Wishing You Luck") and pretty shamrock papers. She also included a traditional Irish Blessing and all sorts of pretty embellishments. It wasn't hard to come up with something great!


Just look at that beautiful shamrock DP! It's even prettier in-person. The image was not actually die cut with a Nestability, as the sizing just wouldn't work, so I traced the Nestie die and hand cut with scissors, edging it with dark green ink.
The adorable lass is colored with Spectrum Noir markers, and her shirt and shoes are colored with a silver marker from SU. The shamrock and her headband have a thick coating of Crystal Effects, as you can see here:
Here's a closer look at the Irish Blessing which has been cut into three segments:


Here's a look at the inside which features yet more beautiful DP from April.
We were asked to share a RAK that we have done, or one that we have received. This card itself is going to become a RAK as I'm sending it to a dear friend who is recently widowed. I like sending her cards just as a nice little surprise in her mailbox.
April, a HUGE THANK YOU for such a delightful kit this month!
Now each of you, skip on over to the Divas and Dazzlers (links are on my sidebar) and admire their talented creations. You will be glad that you did!

Feb 28, 2013
Crafters of Faith February Challenge
Welcome to the Crafters of Faith February Challenge!
Many special people bless my life with their love and friendship, and the online blogging group, "Crafters of Faith" are a rich blessing indeed! Each month one of us issues a challenge and we all post our challenge cards on the last day of the month.
Our dear friend Tami came up with this month's challenge, and it was a great one! Here is the challenge in her own words:
I have a crafting tool that I just had to have and have hardly used. Does that sound remotely familiar?! I think you all may have the same tool in your arsenal. I would like you to drag out your scoring tool. Scor-Pal mini, biggie, Martha mini, biggie or if you do not have one of those, I am sure that you may have a scoring blade on your paper cutter. SCORE!!! It would be fun to see how you all incorporate scoring onto your card. You know I am into 'use what'cha got', so if you do not have a scoring tool of any sort, please create without this element. Oh and I do not mean just a score to fold your cardbase in half! LOL
While it is a 'lovely' month February, let's create a card that is not Valentine's themed. That being said, it is the second part of this challenge. Let's not use Valentine theme, red, pink or white colors anywhere on our cards. That includes the paper you stamp your image on....*gasp*!
For our third element, how about we place both an image and a sentiment on the front of the card.
See? I told you it was a great challenge! Here are my two cards:
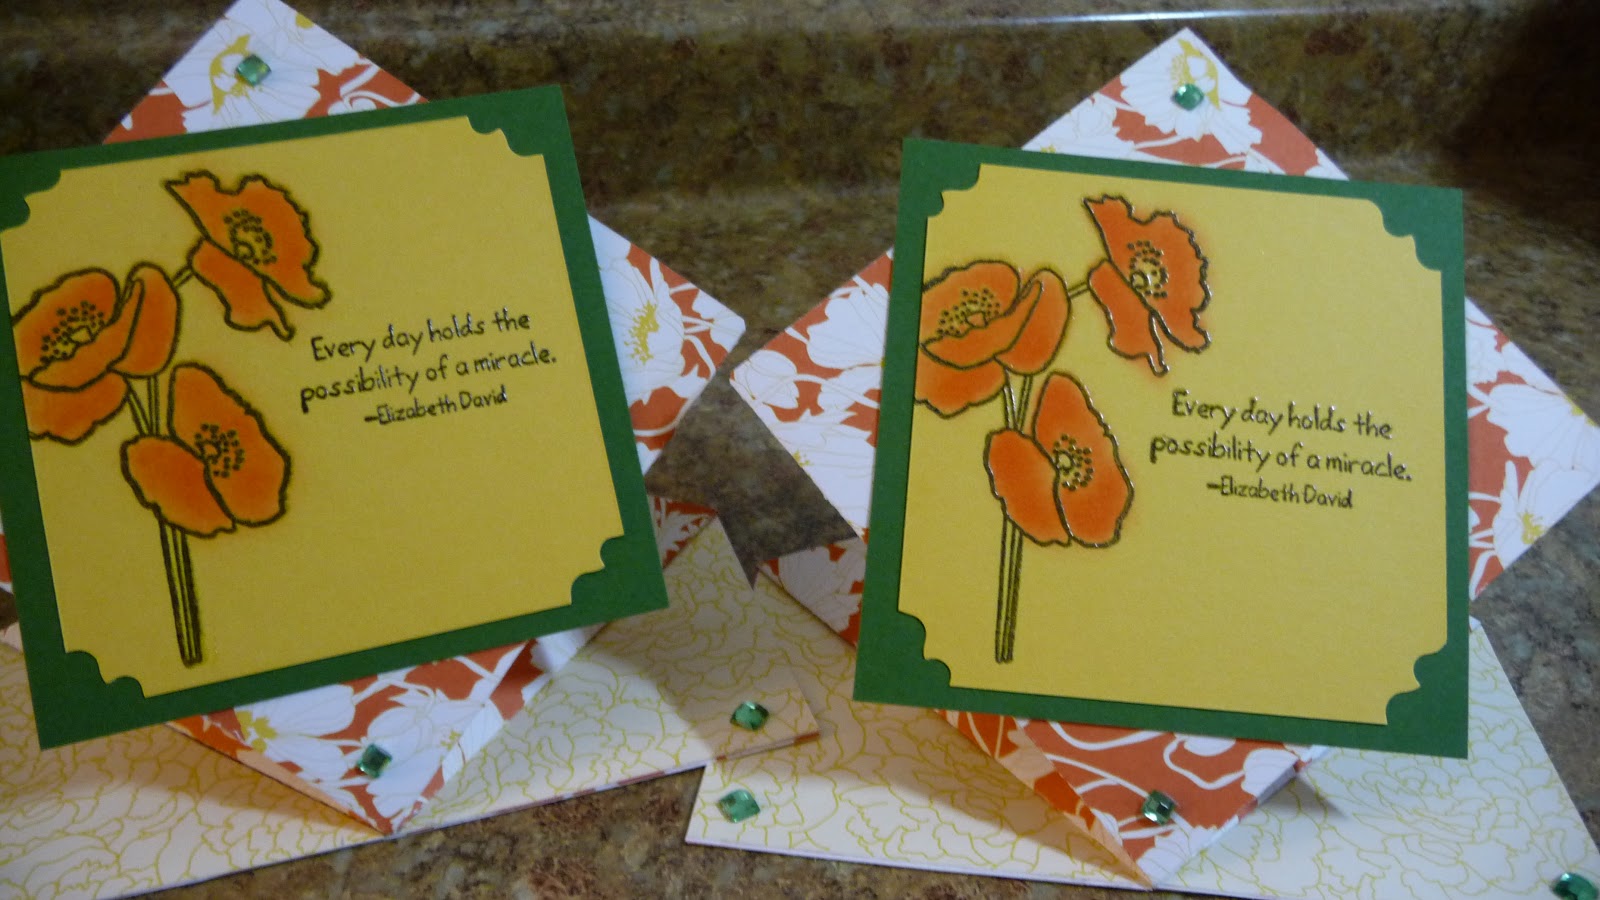
It's called a "Spring" fold (as in spring up) and the tutorial on SplitCoast Stampers can be found here. I found it to be rather easy for me to accomplish, although I did have to layer stiffer cards stock underneath the bottom panel to provide more stability than the DP had on its own.

Here is a closer look. You'll recognize the Stampin Up Designer Paper from a few years back and the sentiment is also from a SU set called "Peace Within". The poppy stamp is from the set called "The Country Diary of an Edwardian Lady".
The green and yellow CS is also from SU and the edges were snipped with some decorative scissors by Fiskars. The images are stamped in black and clear embossed. The poppies are colored with a paint brush and ink from an Orange ink pad by A Muse Studios. The little green gems are from my stash.
Well Tami, how did I do with your challenge? The only thing new on these cards is the fold! ha ha. So I am also going to count these toward the 100 Cards in 100 Days challenge, bringing my total to 55.
Thank you for dropping by and be sure to hop on over to the blogs of the other members in Crafters of Faith. It's sure to be fun admiring their creations for this challenge. Thanks Tami! It was wonderful to learn a new fold as a result of your challenge!
Thank you for dropping by and be sure to hop on over to the blogs of the other members in Crafters of Faith. It's sure to be fun admiring their creations for this challenge. Thanks Tami! It was wonderful to learn a new fold as a result of your challenge!
Feb 25, 2013
Two Sets of Thank You Cards
Hello! I have two sets of Thank You cards to share with you today. Both are in the hands of the US Post Office as they travel to my friend Barb who is hosting a swap on Split Coast.
These were made in memory of my Grandmother and her roses. When I was a young child I spent a lot of time at my Grandparents' home. She grew all sorts of roses, but my favorites where the peachy-yellow ones. So what better way to use the old Stampin Up embossing folder "Manhattan Rose" on a cold, wintery day in February?

The project began with some white shimmery card stock called "Sugar" by A Muse Studios. Pigment ink
"papyay" by A Muse was brayered onto one side of the embossing folder and then the cards stock was embossed.
After the rose panels were embossed, A Muse's "Grapefruit" ink was painted on with a soft brush. The Sugar CS is very smooth, which provided a slick surface to move the ink around with the brush, making it easy to blend and achieve soft color accents.

The panel was layered onto coordinating "Grapefruit" CS by A Muse and ribbons from American Crafts were matched for accents.
The Thank You tags were die cut, stamped & clear embossed with the Sugar CS, "Grapefruit" ink and A Muse's Vintage Labels die set.
I was really pleased with how these turned out. In fact, I think I'll be making some more of these for special birthdays during the year. (although these did clean out 2 rolls of ribbon from my stash, so I may have to replace them or change up the color scheme). These will count as six more cards in my 100 Cards in 100 Days challenge quest, bringing my total to 47!
The second set saw me turning to a more masculine style, so out came the trusty "Lovely as a Tree" set from Stampin Up.

The tree was embossed with a two toned green embossing powder that was a purchase at a stamp show years ago. There is no label on the little jar, so I'm not sure of it's origin.
The thank you was embossed with copper EP by Ranger and the die cut is also from the Vintage Labels set by A Muse.

The base is a very dark brown print (one side only, so inside is cream) from a DCWV pack "Natural" and the dotted embossed layer is from the "Dotted Swiss" pack by Bazzil.
The ribbon is a brown satin from either AC Moore or Michael's. A fairly clean layout, with a slightly rustic main panel from SU's "Natural" CS.

Here's a look at the supplies used for the first set of cards:

The second set of cards brings my tally to 53 cards, half way to the goal. I must say that I'm having a great time using up some of my supplies, and pulling out some old stand-bys!

The project began with some white shimmery card stock called "Sugar" by A Muse Studios. Pigment ink
"papyay" by A Muse was brayered onto one side of the embossing folder and then the cards stock was embossed.
After the rose panels were embossed, A Muse's "Grapefruit" ink was painted on with a soft brush. The Sugar CS is very smooth, which provided a slick surface to move the ink around with the brush, making it easy to blend and achieve soft color accents.

The panel was layered onto coordinating "Grapefruit" CS by A Muse and ribbons from American Crafts were matched for accents.
The Thank You tags were die cut, stamped & clear embossed with the Sugar CS, "Grapefruit" ink and A Muse's Vintage Labels die set.
I was really pleased with how these turned out. In fact, I think I'll be making some more of these for special birthdays during the year. (although these did clean out 2 rolls of ribbon from my stash, so I may have to replace them or change up the color scheme). These will count as six more cards in my 100 Cards in 100 Days challenge quest, bringing my total to 47!
The second set saw me turning to a more masculine style, so out came the trusty "Lovely as a Tree" set from Stampin Up.

The tree was embossed with a two toned green embossing powder that was a purchase at a stamp show years ago. There is no label on the little jar, so I'm not sure of it's origin.
The thank you was embossed with copper EP by Ranger and the die cut is also from the Vintage Labels set by A Muse.

The base is a very dark brown print (one side only, so inside is cream) from a DCWV pack "Natural" and the dotted embossed layer is from the "Dotted Swiss" pack by Bazzil.
The ribbon is a brown satin from either AC Moore or Michael's. A fairly clean layout, with a slightly rustic main panel from SU's "Natural" CS.
I like how flat these two sets are, making them easy to mail.

Here's a look at the supplies used for the first set of cards:

The second set of cards brings my tally to 53 cards, half way to the goal. I must say that I'm having a great time using up some of my supplies, and pulling out some old stand-bys!
Thank you for stopping by and I wish you a great day!
Feb 15, 2013
Love by the Sea
Hooray for the 15th - the day that the Dueling Darlings can reveal their cards! The Dazzlers enjoyed a wonderful kit put together by our own Paola, and it was perfect for Valentine's Day, or a special anniversary, an engagement congrats, etc.!
Here's my creation with her goodies:


The only items used from my stash were the blue & red CS and the red Stickles. Everything else was supplied in the kit. WOW, what a great kit (many thanks Sweet P!)
This stamp has a special place in my heart, as I've used it to make a birthday card for our son, coloring it to match him and his lovely girlfriend. So, of course, I colored it the same way this time around. They are so good for each other and we adore her!

Here's a little close up of the sentiment that we had to work with. I hand cut (since I don't have many punches) the For You With Love, then used the one circle punch I own to cut the red layer. Dressed it up with a thick layer of Stickles and popped it up with dimensionals.

This is a closer look at the left side of the card front, showing more of the wonderful DPs that Paola gave us. She also included those wonderful brads and flowers. Aren't they pretty?
Paola also included 2 types of glitter ribbon, some red & white floral ribbon and a few other brads. I spent so long trying to tie a bow with the red glitter ribbon that most of the glitter ended up on my work surface, and the bow looked pretty sad so I didn't use it. :(
All in all, I am pleased with the colors and the layout so a big "THANK YOU" to Paola for the kit!
Be sure to drop by the other Dueling Darlings and admire their lovely and talented creations. Their blogs are linked in my side bar.
This is my 41st card in my quest for 100 Cards in 100 Days (the only items used from my stash were the red & blue CS and Stickles) Thank you for dropping by today!
Here's my creation with her goodies:


The only items used from my stash were the blue & red CS and the red Stickles. Everything else was supplied in the kit. WOW, what a great kit (many thanks Sweet P!)
This stamp has a special place in my heart, as I've used it to make a birthday card for our son, coloring it to match him and his lovely girlfriend. So, of course, I colored it the same way this time around. They are so good for each other and we adore her!

Here's a little close up of the sentiment that we had to work with. I hand cut (since I don't have many punches) the For You With Love, then used the one circle punch I own to cut the red layer. Dressed it up with a thick layer of Stickles and popped it up with dimensionals.

This is a closer look at the left side of the card front, showing more of the wonderful DPs that Paola gave us. She also included those wonderful brads and flowers. Aren't they pretty?
Paola also included 2 types of glitter ribbon, some red & white floral ribbon and a few other brads. I spent so long trying to tie a bow with the red glitter ribbon that most of the glitter ended up on my work surface, and the bow looked pretty sad so I didn't use it. :(
All in all, I am pleased with the colors and the layout so a big "THANK YOU" to Paola for the kit!
Be sure to drop by the other Dueling Darlings and admire their lovely and talented creations. Their blogs are linked in my side bar.
This is my 41st card in my quest for 100 Cards in 100 Days (the only items used from my stash were the red & blue CS and Stickles) Thank you for dropping by today!
Subscribe to:
Posts (Atom)