Nov 15, 2021

Tic Tack Toe Duel

 November 15th and time for another duel!


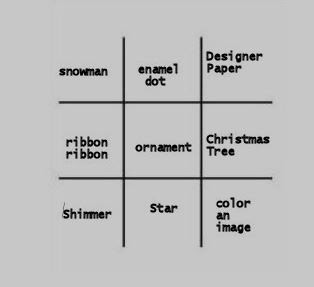
Carol and Shelly gave us a fun one this round - Tic Tack Toe!  Here's the game board:

The idea is to pick a row and use each of those elements on your card.  

Here are the contents of our kit from Shelly:

Image-Unity- Christmas Tree of Hope, Joy, Love (included)

DP- Paper Studio

Glitter paper in Gold punched using a SU boarder punch.

Gold- Paper Temptress cardstock cut with Spellbinders star die
Ribbon- All from Hobby Lobby

Twine- from my stash

Button-silver star

Sequins-from stash

Here's my card using the center row of Ribbon, Christmas Tree & Ornament:

I couldn't resist using three of the cute DP's that Shelly included, and several  ornaments: the gold star on the bottom, sequins on the tree image and the silver button star on the top.

All things must change...sigh.  Shelly, Debby and  LJ are leaving our group and this is their final duel.  They will be missed for sure!  We hope that they check in with us from time to time in the future.

Shelly, and Carol, a big thanks for such a clever idea and a fun round!  Time for me to hop around to everyone's blog or Gallery and admire their cards for the duel.  If you want a treat, you should visit as well!  Links are in my left column.

Thanks for stopping by!

Sep 17, 2021

A Fall Pumpin Duel

It's certainly not the 15th, the designated "Duel Date", but in the category of Better Late Thank Never...here is my card!

Tracie and Barb are hosting this month's duel and chose Pumpkins as the theme.  Tracie's kit included:

Images from Newtons Nook, "Pumpkin Latte"
Prima "Pumpkin & Spice" designer papers
Prima "Pumpkin & Spice" crystals
Memory Box "Stitched Farm" pumpkin die cuts
Twine & assorted buttons

Tracie, thanks so much for such a darling kit and for giving us so many options to work with!  (and such beautiful colors too!)

I loved the papers so much that I used them as the focal point of the  front and inside the card.  I colored the Latte Girl with Castle Atrs Premium Soft pencils.  She is fussy cut and popped up along with a couple of the pumpkins to give some dimension to the front.

Below is the inside of the card, featuring more of the beautiful papers:

My apologies to all of the Classy Card Ladies for being tardy.  It's been a challenging week around home.  TGIF!!!

Now I'm off to admire the creative endeavors of the rest of the gang.  Do yourself a favor and visit their galleries and blogs.  Links are in my sidebar!

Aug 15, 2021

It's a Wild, Wild West Duel!!

Today is the 15th and time for another Classy Card Ladies Duel.  Suzy (hostess for the Diamonds) and Debby Hostess for the Pearls) grew up in New Mexico and Texas.  They decided on a Wild West theme for this challenge and it was LOADS OF FUN, PARDNER!  

Debby's kit had so many great elements that I decided to do a stair step card to give me enough real estate to use them!  Here's my creation:

Kit Contents:

Images:  Cowboy is from Suzy Stamps and Armadillos are from Deadbeat Designs
Sentiments: Yippee & Yahoo are from Suzy Stamps and Howdy is from Deadbeat Designs.
Ink:  Mementos Rich Cocoa on white Recollections card stock.
Designer Papers:  Paper Crafts Love Nest, Paper Studios Copper Metallic and Authentique Aged Leather, Recollections Cream and Cocoa.
Embellishments:  Paper Craft tags, Crafters Square sequins, Recollections burlap ribbon and other ribbon and twine from Debby's stash.

Images were colored using Spectrum Noir markers.  I'll fess up: I used Google to know what colors to use on an Armadillo 😉

Time to "SADDLE UP" and get on over to the blogs and galleries of the other Pearls and then "MOSEY" over to the Diamonds and take a gander at their creations!

Thanks, gals, for a great theme this go-round!  Yee-haw!


Jul 15, 2021

In the Clouds Duel!

On the 15th of each month a great group of friends on Split Coast, the "Classy Card Ladies" have a challenge duel.  The two teams, Diamonds and Pearls, rotate the hostess for the duel.  Each team's hostess picks the theme and sends a small kit to each team member.  Today's the day for the Diamonds and Pearls to show off our creations using these kits!

I'm a member of the Pearls, and this month's hostess is Jeanette.  Hostess for the Diamonds is Kelly.  The theme that they selected is "In the Clouds".  Here is my card, using my latest favorite fold/layout:


The silver cloud on the right panel is popped up on only the farthest right side, leaving the other side of the cloud available to tuck in the 1/4" panel of the front.  This makes a cute stand-up card.

Here's a closer look at the right hand side.


Overall card dimensions are 5x7.  Fold 1/4" on left and right sides of the front panel.  Score the front panel at 2.25" and 4.75", fold to get the pop out shape.  

Here's the front panel flattened a bit for you to see.


Here's a look at the inside and the back of the front panel:


Kit Contents:
Images and Sentiment by Fun Stampers Journey "Fly Away"

Papers:
Stampin' Up Metallic Silver, Paper Studio Black & White Diagonal Stripe, Embossed clouds using Darice Embossing Folder and Fun Stampers Journey cloud die with SU's Metallic Silver card stock

Ribbons are Stampin' Up and Enamel Dots from Recollections.  The Sequins are from Jeanette's stash.


This was a very fun kit!  Thank you Jeanette!


Now it's time for me to go and admire the creative talents of the Diamonds and the Pearls.  Have a look - links to their galleries and blogs are in my side bar.  Then, maybe you can go outside and admire the clouds!


Jun 15, 2021

Classy Card Ladies Salt Life Duel

 On the 15th of each month two teams of friends (The Diamonds and The Pearls) on Split Coast Stampers have a duel.  This month Kelly from The Diamonds sent both teams the challenge kit, entitled Salt Life.  She lives in Miami and said that almost every car has #SaltLife! on it, and thought it was perfect for us to celebrate the beginning of the Summer Season.


This is what I came up with.  The image is colored with Spectrum Noir markers, accented with Wink of Stella clear glitter.


Doesn't he look like he is ready to jump into the surf?


Image: Photo Play 
Tulla and Norbert's Excellent Adventure Collection 
stamped onto #110 Recollections with Memento Tuxedo Black Ink.

Designer Papers are from the same collection.  So Cute! 

Kelly included a variety of embellishments from her stash.

Here you can see a close up showing the Wink of Stella on the tag, his snorkel mask and beach ball:


This was really fun for me.  Not owning any gnome stamps myself it was nice to play with this little guy!

Be sure to visit the Galleries and Blogs of all The Classy Card Ladies, links are in my side bar.  

Time for fun in the sun and the Salt Life!

Jun 13, 2021

Hot Mess = Success!


It's the 13th of the month and time for another Hot Mess = Success card making challenge!  The concept is that even though the creation process is messy, we can end up with success...well...in my case, most of the time!

Edit: When-oh-when will I get it through my head that the posting date is the 12th, not the 13th???

My friends have been inspiring me with their amazing results using various techniques with  alcohol inks, Yupo paper, etc.  So I bought a few colors and hit the YouTube channels for some instructions. 

Jennifer Mcguire's Video for Alcohol Resist Stamping caught my attention:

https://www.youtube.com/watch?v=vGCk30_grqc&t=535s

Here are my two panels:


The larger panel on the right is on Yupo and has Dijon and Citrus Ranger Inks blended after spritzing with rubbing alcohol.  

Then, ink up a stamp with Ranger's Alcohol Resist Lift Ink and stamp onto the Yupo panel, and then onto regular card stock.  If using a Misti type tool, you could repeat this until the image on your regular card stock panel is darker.  

Take a paper towel and blot the Yupo panel and image until it emerges from the inked background.  Be careful to rotate your paper towel so that you're always using a fresh part and not transferring ink back onto the panel.

Here's my first attempt at this last month:


I like the Yupo panel colors and swirls better than this go around.  However, here's my Lesson Learned:

The dandelion stamp creates too faint of an image to get good results.  At least it did for me.


Then trim up your panels and make your cards.  My end results:


Next time, I think I'll create some color on the card stock panel, maybe use a mask to create an oval or something similar.  Perhaps using a light colored card stock, or getting more colors on the Yupo panel.  I thought the image stamped onto the white card stock looked too stark, so I sponged some light yellow onto it.

Both of these cards are hitting the mail to my good friend in NH who is having her first knee replacement surgery later this week.  

Now I'm off to these blogs to admire the Hot Mess Successes created by my friends:

Kelly

Jeanette

Barb

Terry

Carol

Do yourself a favor and see what they've created!


May 22, 2021

Wedding Slim Line Card Duel...One Week Later!

 The Classy Card Ladies usually post our Monthly Duel cards on the 15th, but the Postal Service played havoc with some members receiving their kits.  As a result, we agreed to post today, giving some members more time for a replacement kit to be received.

Our hostess for the Pearls (my team) is Shelly and the hostess for the Diamonds is Carol.  Shelly sent us a bursting-at-the seams kit with a wedding theme!

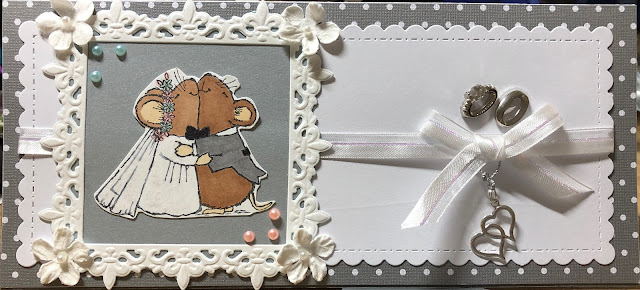
Here's the front of my card:

Here's a side angle, trying to show the glimmer added to the bride, the white flowers and the die cut frame:

The inside was finished off with more of the papers, some bling and one of the sentiments:

Kit contents included:

Stamps: Great Impressions; Sentiments - Printworks, Heart and Soul Blessings (all stamped with Memento Tuxedo Black Ink)

Papers: Cardstock and Designer Papers from Bazzill and other companies

Diecuts: CC Designs Scalloped Slimline and Joy! Crafts Embossed Frame

Envelope: Simon Says

Embellishments: Amazon Colored Pearls, JoAnn/Park Lane Pearls, Maya Road Roses Trim, Offray Ribbon, Paper Studio Small White Flowers, Recollections Bling Strip, Recollections Small White Flowers, and Charms and Twine from unknown vendors

Thank you Shelly and Carol for a fun theme that I don't think we've done in the past.  Big shout out to Shelly for so much fun packed into our kits!  Now I'm off to visit blogs and galleries of the Diamonds and Pearls to admire their wedding creations.  I suggest that you do the same!  Links are in my side bar.


May 12, 2021

Mother's Day Hot Mess=Success Card

 Last weekend I had a few hours of crafty time, so I tackled a card that was showcased in the recent Crop & Create Delivered Cardmaking event.  The virtual classes were held on March 19-21 and it was a blast to attend, and making it even more fun were my friends Barb and Jeanette who also attended!  We texted and shared photos throughout and it was great.

This card was taught by Libby Hickson using products from Hero Arts.  I knew that I would not be able to keep up during the actual class, so I saved it for when I could work at my own pace.  (Tutorials are available online for those who register).  

Here is the finished card:


The Hot Mess part:

This "direct-to-paper" technique was new to me, and thus it was intimidating.  But it actually was fun, and easier than I thought.  

Do yourself a favor and use slightly glossy card stock, stock with a super smooth finish.  The colors will transfer nicely.  Yes, I had brightly colored finger tips for a few hours!

Next I tackled the layered hummingbird stamps. 
This is the set from Hero Arts:


Using the same stamp pad, you select different greens to layer the image and finish with black ink that outlines the bird.

Libby provided excellent instructions and I successfully produced three hummingbirds!


Then the flowers, two layers, using the same stamp pad.


After letting everything dry, the matching set of dies were used to cut the flowers and hummingbird.  The black panel for the card front was die cut with Hero Arts' "Through the Woods Window Fancy Die".  Since I wanted more than one card from this effort, I positioned the black panel and chose where to cut the variegated panel prepared at the start.

Then it was LOL - Laboring Over Layout! Eventually ending up with the placement for sentiment, hummingbird and flowers.


Eventually I cut off some of the flower stems and tucked them behind the black leaves to give it some interest.  Slight amounts of glitter from a clear Wink of Stella Pen accented the bird's wings and some of the flower petals. 

It's finished off with a bright green interior panel with a Happy Mother's Day sentiment.  All in all, I felt successful and enjoyed making these cards.


Now I'm off to these blogs to admire the Hot Mess Successes created by my friends:

Kelly

Jeanette

Barb

Terry

Carol

Do yourself a favor and see what they've created!

Thanks for stopping by!


Apr 15, 2021

Dueling with Tuesday Morning Sketch # 567

 It's the 15th and that means it's time for the Classy Card Ladies to duel it out.  Laura Jean (LJ) and I are hosting this round and we challenged everyone to use sketch #567 from Tuesday Morning Sketch!  LJ asked and was granted permission for us to use the sketch.

If you're not familiar with them, pop on over to their website and take a look:

                    http://tuesdaymorningsketches.blogspot.com/

Here's the link to our specific sketch:

...And here's my card:


Image and sentiment from "Exercise Grumplings" by Taylored Expressions.


Floral paper from Love Nicole's "Floral Doodles" pad.


Candy dots are from Stampin' Up and the fun washi tape is from some strange place online, hahahaha!  The writing on the spools is Sanskrit so I have no clue.


The Grumpling and sentiment are colored with Spectrum Noir markers.

Here's a closer look at the washi tape to show how glittery it is:


And here is the actual sketch:


Be sure to visit the blogs and galleries of the Pearls and Diamonds (our 2 teams) and admire their creative take on the sketch.  

Have a great day!

Mar 15, 2021

Classy Card Ladies March Duel

 It's the 15th of March and the Classy Card Ladies (CCLs) are posting their cards for the March Duel.  Hostess of the Pearls for this round is Tracie and the Hostess of the Diamonds this month is Barb.  They chose "Butterflies" as the theme.  

Tracie wrote, "As I write this note to you it is -2 degrees outside with a wind chill of -21..."  YIKES!  Hence the cheerful spring theme.

Here is the front of my card:


I used SU's Early Esspresso as the card base.  All other papers were included in Tracie's kit.  They are "Simple Village Botanicals" and "Simple Vintage Garden" in the Simple Stories collection.  Aren't they gorgeous?

Little flowers by Recollections, the Wooden Butterfly (colored with a marker) is from Tracie's stash and I suspect that she hand made the butterfly in the upper corner.  It's so pretty

The sentiment and image are from the set "Garden Mice" by Newtons Nook.  I colored the sentiment with one of my markers.

Not wanting to cover up any of the lovely papers, I put the adorable mouse image on the inside and used more of the designer papers on the opposite panel:


It looks like the strip behind the Doodlebug Mini Doily is crooked, but it's my lack of photography skills at work, LOL.  

It's been spitting rain/hail/snow mixtures on and off all day here in the Pacific NW, so thinking of Spring and warmer weather and playing with this kit was the perfect way to spend my time.  

Thanks Tracie for a wonderful duel this month!  I'm off to visit blogs and galleries of the other CCLs to admire their work.  Links to each are on my left sidebar, hop around and leave them some love.

Feb 15, 2021

Classy Card Ladies - February Duel

 It's the 15th and time to show off our creations for the Classy Card Ladies Monthly Duel! 

I'm a member of the Pearls and Debby is our February host.  For this month's challenge she picked an image from Impression Obsession and received permission from Mitra at IO to share the image for our duel.  (Many thanks Mitra!  Now I think I need to buy this stamp!)

Here's what I came up with:


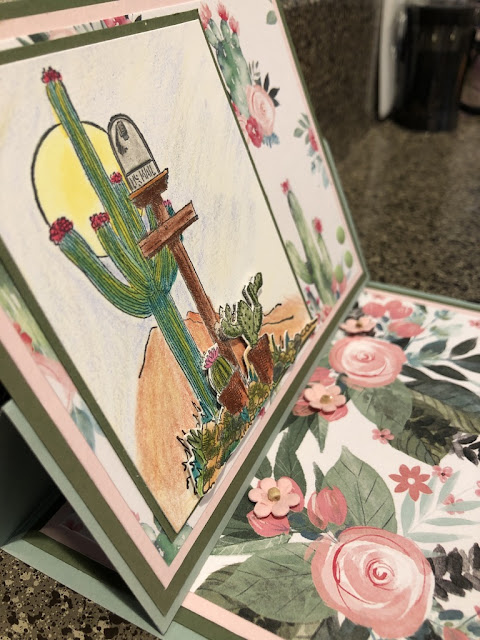
It isn't obvious from this photo, but the bottom of the image with the 2 potted cacti and surrounding rocks, earth etc. is fussy cut and popped up a bit onto the panel.

The lovely papers are all from the Paper Studio: "Floral Cactus" and Floral Clusters with Leaves".  The papers were so beautiful that I decided to make an easel card to show them off:


The image is colored with Castle Premium Soft Touch pencils. The image was stamped on Paper Studio white card stock with Memento Tuxedo Black ink.

I used the little pink flowers from the Paper Studio to hold the easel card's front panel.  Enamel dots are from Eyelet Outlet and I really like them because they're flatter than most and that makes this card easier to mail!

Here's a bit of a side view to show more of a dimensional aspect of the card:


You can get a peek at the popped up portion of the main image.

Aren't those papers gorgeous?  

Debby, you sent us such a fantastic kit that it was easy to create a pretty card!  Be sure to check the blogs and galleries of the other Classy Card Ladies, which are listed with links in my left side bar.


Jan 27, 2021

Mini Winter Stamp Camp: Barb's Class

Some dear friends and I are holding a virtual Mini Stamp Camp - Winter Version this week. Barb was our instructor for Monday and she posted a great tutorial on Strip Cards.  Check it out here:

http://inkingintoretirement.blogspot.com/

Here are her lovely cards:


The technique is to cut strips of matching card stock in various widths and adhere them to a panel.  Die cut several sentiments and glue them on top of each other to get some depth.  Then mount the sentiment to the front of the panel.  Pretty cool, huh?

Here's my take on her challenge:


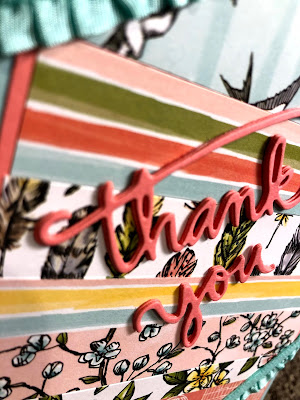
Papers are from Stampin' Up's Bird Ballad collection and the ruffled ribbon is also Stampin' Up, Coastal Cabana color.  

The die is "Thank You Cursive" by Savvy Stamps.  I cut 4 layers and glued them together to get some depth since the die is so delicate.  Here's a side view:


This was a really fun card to make and it has a lot of potential, limited only by one's imagination.

Thanks Barb for a super start to our camp week!  I need detention from you, as I am tardy with completing your assignment <wink>

Here are our blogs and the days we are the camp counselor:

Monday, January 25 ~  Barb @ inkingintoretirement
Tuesday, January 26 ~ Darlene (me!) @ Accordingtobijou
Wednesday, January 27 ~ Kelly @ Sandcastlestamper
Thursday January 28 ~ Jeanette @ Creativeplay

Hop on over to their blogs and admire their take on each day's challenge!  Join in the fun and play along.  We'd love to see your work.

Jan 25, 2021

Stamping Sisters Mini Winter Camp - Day 2


Welcome to the Stamping Sisters Mini Winter Camp 2021.  Last year our first Stamping Sisters Mini Card Camp occurred June, thanks to our dear friend Kelly.  Once Kelly set up all of the details, the rest of us just couldn't resist joining in!  

We all had such a good time last summer that Barb stepped right up and agreed to  organize another round which is set for this week. Thanks Barb!

Here are our blogs and the days we are going to be the camp counselor:

Monday, January 25 ~  Barb @ inkingintoretirement
Tuesday, January 26 ~ Darlene (me!) @ Accordingtobijou
Wednesday, January 27 ~ Kelly @ Sandcastlestamper
Thursday January 28 ~ Jeanette @ Creativeplay

OK...my class, along with my "tutorial" is "Reflection Technique".  Why do I have "tutorial" in quotes???  Because my card is a lesson in what went wrong!  Hahahahaha!  I can't wait to see what you all can do RIGHT!  I do hope that you  play along and have fun in our winter virtual stamp camp!


  So...My idea was to watercolor a landscape with sky, earth and lake.  Then create silhouettes of trees using SU's timeless classic "Lovely as a Tree" set.


For this project I decided to use pencils and a rough water color paper because the texture would add to the landscape.  I used a very fine brush so that I could control the water and blending.  Didn't want my sky to turn green if blue and yellow mixed!

Here is the background panel...before I decided that the lake needed colors from the sky reflected in it.  You might NOT want to do this hahaha.


Here you can see the SU watercolor pencils and tiny paintbrush that I used to limit the amount of water while blending.


After the blending was (sort of) done, I trimmed the panel to match the CS that would frame it on the card stock.

Then the real "lessons learned" began!


As you all know by this picture, I masked off portions of the long stamp in the set which has multiple trees, picking and choosing which trees I wanted in the landscape.
DON'T DO THIS!  Why? Well, in order to make the reflection in the water you need to stamp it upside down from the initial image.  Which meant that I needed to carefully remove ink from the stamp and try to line it up under the original image...some of the trees are overlapping on the stamp, making it difficult at best.

Oh! Another thing that I would not do again is include so much of the yellow and coral reflection colors in the lake.  I think it is too distracting.  

Here's another big lesson: I used Memento Tuxedo Black and it's too light on the original set of trees and even lighter after stamping it off once to make the reflected image.  Use a darker, more juicy ink because the watercolor paper absorbs so much of the ink.  But remember to stamp off the reflected image first before applying it to your panel.

I read that you could stamp your image onto an acrylic block, then use the acrylic block to apply the reflected image to your panel.  Here's me trying to line up the acrylic block so that I can stamp the trees and use the block to then stamp the reflection.


DON'T DO THIS.  Hahaha
Epic fail. I ended up with a bunch of black smudges in my lake.  

Which is why I added the sky colors to help cover it.  Sigh.


What I ended up doing was painstakingly inking and wiping off areas of the stamp that I didn't want to make individual tree reflections. If I just stamped the whole panel without mixing up the trees, I would not have had to do this for the reflection.

Back in 2012 (really that long ago?) I posted a reflection card using vellum with the reflected and colored image.  


Flip the vellum over and you have an instant reflection of the original image.  This time I wanted to try the reflection technique without vellum and using watercolors and a silhouette image...I still think it's possible. 

I have every confidence that Jeanette, Barb and Kelly will prove me right!  Please visit their blogs and see how they apply my lessons learned and create great reflection cards!

I can't wait to see your lovely Reflection Cards and learn from you!  Hopefully my tips and lessons learned help you make a masterpiece.


Jan 15, 2021

Classy Card Ladies' January Duel!

A group of friends on Split Coast Stampers have been "dueling" on the 15th of the month for years. This year we did a refresh, changed our name and team names and Bang! We're off for a fun year of dueling again!

This month "The Pearls" (my team) hosted by the lovely Jeanette, and "The Diamonds",  hosted by the effervescent Kelly chose "Winter Fun" as the theme.
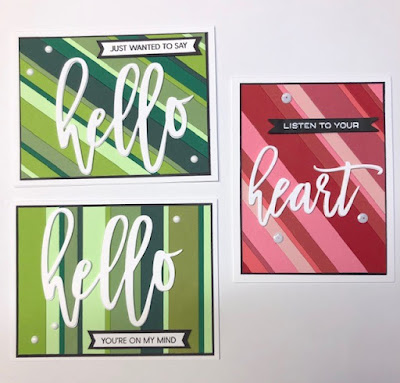
Here's my card with Jeanette's great kit:

I folded the card off-center by about an inch to give me a panel on the right and die cut 3 hearts from the pretty papers that Jeanette included.

The image is colored with Stampin' Up Blenders and the snowball and ground are accented with Stickles.


Here's the opened card where I cut apart the sentiment and stair-stepped it.

Kit contents included:

CC Designs "Snowball Heidi" and sentiment by Close To My Heart's "Flakey Friends" collection.

All designer papers are from Recollections "Fa La La" paper pad.

Red snowflake ribbon is from Joann's and the teal ribbon is Offray.

Jeanette's generous kit also included rhinestones, sequins, a wooden snowflake (that I really wanted to use but couldn't work it in) and a charm with a snowflake brad.  I'm thinking another card is in order to feature these goodies!

Time for me to run over to my folks' house and get their dinner ready, but when I get back home today I'll finish this post with the names of everyone on the Pearls and the Diamonds.  I will also update my side bar with links to their galleries or blogs to make it easy for you to visit and admire their cards.

Good bye for now!

Jan 14, 2021

January's Hot Mess!

 On the 12th of the month, a group of friends on Split Coast have formed a "Hot Mess" challenge group.  The only requirement is that your project is messy to create!  No need to check your calendars...I'm a couple of days late.  Below is my card.

The colors are purple and yellow.  This card is for Barb's swap on Split Coast and the challenge is to use only two colors.  

It's a full sized floral background stamp and the large rectangle mask was used from Taylored Expressions Masking Stencils.  Then the Happy Birthday sentiment was stamped.  Purple ribbon and yellow flower finishes it off.  

End result is an easy-to-mail card because it's flat!  The other end result were several stained fingers and fingernails from removing the mask, washing it off, then making the next card!  My cotton wash cloth that I use for stamping is also stained, LOL.


Here's the inside of the card:


I hope that Barb likes these cards.  I sure thought it was a fun swap theme.  It challenged me to only use 2 colors.

Now I'm off to these blogs to admire their Hot Mess Successes:

Kelly

Jeanette

Barb

Terry

Carol

Thanks for stopping by!